Makeup Packaging (Chatter)

When it comes to cosmetic products, what do you value the most? Form or function?

Personally, I place performance primarily. Packaging comes second; if a product isn’t good, it could have the most elegant packaging ever and not matter.

Maybelline Instant Age-Rewind Concealer, for example, is a fantastic drugstore under-eye concealer…but the applicator is silly. I don’t loathe it as much as some others do, but I do think it could have been executed better. To dispense the product, you twist the case and it clicks as it slowly advances the product up to the built-in sponge-esque puff applicator. It isn’t ideal for application, it isn’t as hygienic as many consumers would prefer, and it is difficult to get the product onto a different applicator if you want to try it that way. The product inside the tube is fantastic, though, so many of us deal with it; it is well-worth it.

That said, there are times when packaging can be a purchase-deterrent. When I choose to invest in a product, I expect greater care to be put into the packaging during the design and manufacturing process. Let’s look at three products, here.

Makeup PackagingMakeup Packaging Comparison
elf Studio Blush
, $3 / Benefit Coralista, $28 / Hourglass Ambient Lighting Blush, $35
  • e.l.f. features simple, uncomplicated packaging. It is slim (bag-friendly!), straightforward, and features a window in the front so you can view the shade within while it is closed. There is a small mirror inside. It snaps shut.
  • Benefit Coralista, and all of their face powders, comes in a box. The box appeared to be made from thin, reinforced cardboard or paper that is printed with, in Coralista’s case, pink leopard print and some other motifs – I think palm trees, but I really have no idea. This makeup packaging does not latch to close.
  • Hourglass features classy, sleek packaging. On top of being aesthetically pleasing, it houses the product well, closing with a reassuring snap. If I bought one of these and it took me 20 years to finish, the packaging probably wouldn’t make me feel dated or juvenile.

Read more

My Lipstick Looked…Different

Last year, I went to a MAC counter with a friend to find a lipstick to wear to my wedding. It was winter, I was pale, and I was seeking a My-Lips-But-Better shade that was slightly more pink than my natural lipcolor. I wound up choosing Brave, a satin finish; I loved how it looked with Soar pencil underneath. It was subtle and made me look like me (though I enjoy reds, I feel most comfortable in MLBBs and neutral pinks), which was important considering the occasion.

MAC Brave LipstickMAC Brave Lipstick

Fast forward to late spring! I had started my sunless tanning routine with Million Dollar Tan’s excellent Cabana Tan lotion line. I was tan and golden, and felt good about not harming my skin in the process. I started refining what my day-of makeup was going to be – applying, tweaking, etc. – most times sans lip because, come on. I knew what the lip looked like.

One time I decided to finish it properly, lip and all. I was so excited to be done, thinking, “Oh yes, I nailed this!”

Except I wasn’t as enamored of the lip as I remember being. What?! I remember being so enamored of the shade when I bought it. Was it the cruel salesfloor lighting within Macy’s? No, I had photos of it. In natural light, even. It looked so cool, almost making my lips look ashy…what the hell happened? Lipsticks don’t just change color!

It had only been about a month since I started sunless tanning, but I had reached where I wanted to be – it was enough to change the effect of the lipstick drastically against my skin. Thankfully, the arrival of my Glambot order saved the day; armed with MAC Cosmo, I was able to blend the two lipsticks on my lip (over the Soar lip pencil) to achieve what I wanted on my newly-tan skin.

Because of that, I put Brave away and hadn’t reached for it in a while. Recently having returned to my palest shade (props to Million Dollar Tan – it really lasted!), I reached for it this week and found that it looks good again.

In short, if you tend to be a bit of a chameleon depending on the season, don’t be surprised (or upset!) if certain shades (of lipstick or blush, especially) don’t flatter as much as they did at another time. Certainly don’t do anything rash like throw a product away over it. With lipstick, try mixing it with another lipcolor (or even just topping it with a gloss to alter it a bit). If that doesn’t work,  give it time, wait for the next season, and try again; your skintone has a huge impact on these things.

I’m thrilled to have this particular lipstick back in my rotation. Foundation/concealer being the exception, have you ever found this to be the case with a product in your collection (flattering when purchased, not so much in a different season)?

DIY Lip Scrub

In light of my post the other day about my new almost-favorite probably-too-dark-for-me matte lipstick and the fact that autumn tends to bring around more matte or matte-ish lips anyway, I figured this was timely and appropriate. Not that lip care is inappropriate at any time, but YOU KNOW.

As much as pricey lip exfoliants may entice (looking at you, Bite Beauty Whipped Cherry Lip Scrub or Fresh Sugar Lip Polish), they really aren’t worth it unless you’re that hung-up on branding for something that just whisks away dead skin from your lips. Using chemical exfoliants isn’t a good idea for our lips, so these (just like what I’m going to show you in a moment) are sugar-based scrubs. Check out the ingredient list on both – Bite’s is a nice blend of oils…and sugar, and Fresh’s has a bunch of oils as well as some less-familiar chemical components (not to scare you – chemicals are not always bad. Do your research, as always). Why pay $18-23 for something that is basically oil and sugar? I wish I could channel Sam from Batalash Beauty when I say that it is crazy (crasy! By the way, go check out their blog and YouTube channel. They’re hilarious and damn good artists to boot).

001

You need:

  • A container with a lid
  • Coconut Oil
  • Honey
  • Olive Oil or Almond Oil (not pictured because derp)
  • White or Brown Sugar
  • bonus points if you sub it out for something grainier like Sugar in the Raw
  • Vanilla Extract (artificial is OK)
  • Mixing utensil
  • Optional mixing bowl if you want to make an unreasonably huge batch

Spoon your sugars into your container – I like to do two parts white sugar to one part brown sugar, but 1:1 would be fine, too. Combine them well.

002

Squeeze in some honey… I started on the conservative side with it because I didn’t want this to wind up too sticky:

003

Add your olive or almond oil. You can use both if you want, but I just went with one.

004

Then mix it up…

006

Add your vanilla extract, mix again.

007

Add a dollop of coconut oil, ideally solid.

005

GENTLY combine with the existing mixture, you don’t want to wind up with liquid.

008

Transfer it to your storage container if you didn’t mix it there, then chill for 15 minutes. Now you can use it, just scoop out a bit and apply to lips, rubbing in circles. The oils will allow to sugar to move with ease and will hydrate your lips. If you want to apply lipstick right away, pat them dry afterwards – oil isn’t the best base for a lipstick, after all.

009

The beauty of this recipe is that it is so simple and very adaptable. Hate vanilla? You’re crazy, but the good news is that you can sub in any flavoring you please. Dig orange? Go for it. Hell, zest an orange into it. Want cherry without dropping $18 on Bite’s scrub (I mean, that’s a tub of Dipbrow. More than a MAC Lipstick. Come on)? Visit your baking aisle and pick up some cherry flavoring. Very easy. Not a fan of how olive oil makes this taste? Use an oil with a subtler flavor.

Your lip scrub should be stored in the fridge and can be kept for two weeks.

Do you have any neat DIY beauty recipes?

Worth it? Aztec Healing Clay

Have you heard of it? If you haven’t, that isn’t surprising. If you have, you’re probably a product hipster or other beauty blogger. Aztec Healing Clay is one of those that I get excited to write about because it is under-advertised, not crazy-hyped, but is crazy-good as a deep treatment to help clear out your pores from any ilk that may be hiding within. Gross, but we all know that’s what clay masks are for.

Observe:

Aztec Healing Clay

Aztec Healing Clay

Here’s how to do the thing. Let’s start off with what you need:

Aztec Healing Clay Mask

  • Aztec Healing Clay – You can get it from Amazon for about $14. One pound will last you an absurdly long time
  • Apple Cider Vinegar (bonus points if raw) or Water
  • A non-metal mixing vessel – important! It can be glass, plastic, ceramic, wood, etc – but no metal, please! Bowls and cups are fine
  • A plastic spoon (remember, no metal!) or other utensil to mix with. I use a wooden tongue depressor to mix and even sometimes apply
    •  Usually, though, I apply with a flat foundation brush
  • Gloves (optional)

The unassuming little jar with silly graphics saying it is Aztec Healing Clay. It is a clay mask, but not in an oft-used format; when you open the jar, it is full of … what?

Aztec Healing Clay - Opened

Greenish powder. Aztec Healing Clay is calcium bentonite clay – and Aztec Secret gets theirs from Death Valley, California. Be careful to open in an area that is easy to clean, such as over a sink. The clay powder is very fine and gets all over the damn place very easily. It is an all-natural, single-ingredient, cruelty-free skincare product – how awesome is that? The real beauty of this product is its versatility – although it is a clay mask, it is usable by people with multiple skin types. It isn’t a one-size-fits-all approach; you just change what liquid you mix with the Aztec Healing Clay powder to suit your needs.

I, for example, use Apple Cider Vinegar (ideally, you should use raw ACV, but I don’t keep that on hand and did not want to make a special trip for it.) because my skin is normal/combination t-zone and not sensitive. If you are dry or sensitive, though, you might want to try this with water initially to gauge your skin’s reaction.

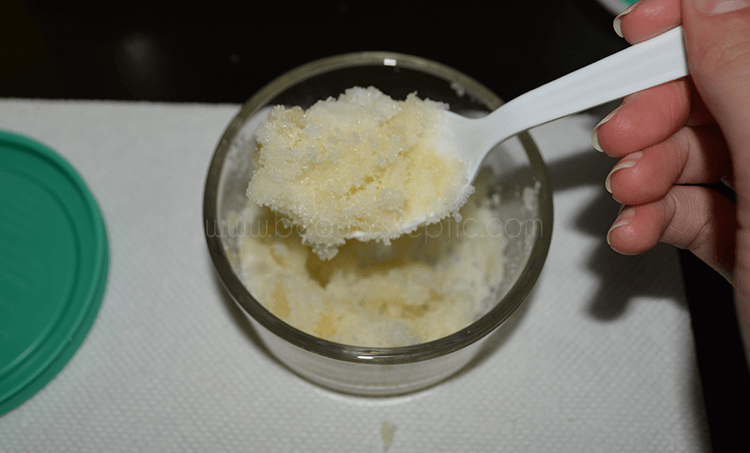
Measure equal parts Aztec Healing Clay…

Aztec Healing Clay

And Apple Cider Vinegar (or water)…

Aztec Healing Clay

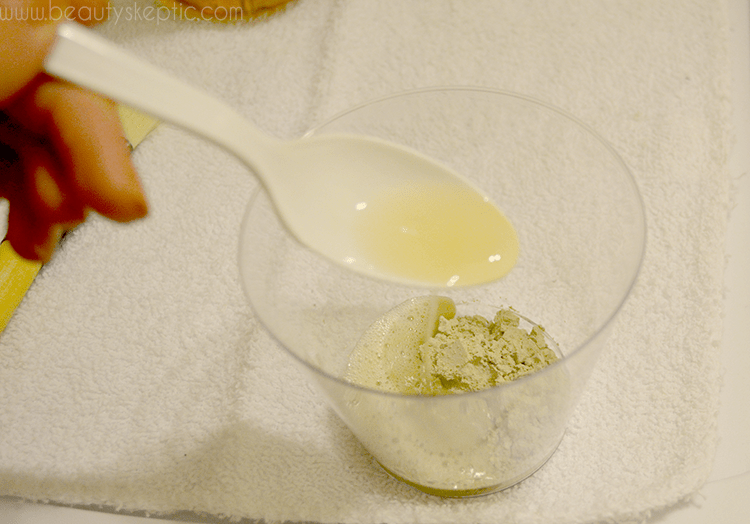
Into the cup. One tablespoon of each is more than enough to do your whole face and, for me, my neck. You will notice it fizz a little as the vinegar reacts (normal). Quickly and thoroughly mix into a paste…

Aztec Healing Clay

…and then realize it is too thick and spash a little more ACV in.Aztec Healing Clay

If you’re using gloves, put on a glove, scoop some out, and apply it to your face like you would any other clay mask; avoid the eyes, coat everything else. If you went the tongue-depressor, scoop some of the Aztec Healing Clay paste out onto your tool and smooth into your face. This is definitely going to feel like you’re troweling mortar onto your face, but that’s okay – that’s what it should feel like. If you went the brush route, do the same thing – it will feel a little more luxurious than troweling mortar, though. The product itself suggests a layer of clay 1/8″ to 1/4″ thick; the latter is ludicrous to me (go get a ruler, check exactly how thick 1/4″ is. report back. yeah.) but 1/8″ is reasonable.

Aztec Healing Clay

Let it dry, let it dryyyy… sensitive folks, wait ten minutes to twelve minutes and rinse with warm water. Otherwise, 15-20 will do the trick. While the Aztec Healing Clay dries (especially if you go with the longer duration) your face is going to get uncomfortably tight. That is normal and okay – my advice is to avoid making facial expressions while waiting. You may also feel a warming or pulsating sensation – also normal, nothing to fret over. Woo circulation!

Once it is time, fetch thyself a washcloth – one you don’t feel particularly attached to in case it stains. Run some warm water, splash it on your face and then soak the washcloth. You will now have to scrub the Aztec Healing Clay off (no, it does not just rinse off as much as they would like to tell you that is the case). Be patient and go gently – your skin will feel tight from the mask, so rub in little circles, not zig-zagging all over your face tugging it from here to there. Rinse the washcloth off as needed and continue until your face is green bentonite mortar-clay free!

Your skin will likely be a little pink or red. Don’t be alarmed (of course, if you are having an actual reaction you should know that and seek treatment accordingly. I am not a medical professional!) if it is, the mask just got the circulation in your face going. It will subside – mine usually goes away within a half hour, but I’ve heard some people have needed longer. To be on the safe side, you could do this Aztec Healing Clay treatment the evening and give your skin overnight to return to its usual coloring. Slap on your moisturizer of choice (do not skip this! your skin will be thirsty!) and enjoy your very clean, firm, and radiant skin. To heck with a pore strip; this thing demolishes any sebaceous filaments or blackheads you may have.

For as inexpensive as Aztec Healing Clay is and with how awesome it performs, it is really a Holy Grail item when it comes to skincare and is definitely worth it. I switch it up sometimes, but this is definitely a staple in my skincare routine. I personally use this once every week to two weeks depending on how my skin feels…and it has been all the better for it.

Once you’ve gotten used to how to use Aztec Healing Clay, you can check out their (ancient-looking) website for some other skincare recipes!

Maybelline Creamy Matte Lipstick – Divine Wine

Lipsticks are one of those fun items that you don’t need a ton of time to test in order to fully evaluate. Despite the fact that I don’t wear them often (they’re a little high-maintenance for my day-to-day tastes), I love the look of a matte lip. When I heard that Maybelline added this new Creamy Matte Lipstick formula to their Color Sensational line, I was damn excited. I actually saw them on YouTube first before seeing them in a store, on a blog, etc – Nicole Guerrero was wearing Touch of Spice in a recent video and I was like, “Yep. I need dis.” I looked around and could find no information online, not even on Maybelline’s site.

A few days later, I saw other YouTubers sporting shades from the Color Sensational Creamy Matte Lipstick line and the message was clear, “go to Target.” Next time I was there, armed with a new coupons (no shame in trying something new with one, after all), I went to get Touch of Spice and Divine Wine. They were out of Touch of Spice, but I did get Divine Wine to share with you.

Maybelline Creamy Matte Lipstick - Divine Wine

The caps on the Creamy Matte Lipstick shades are identical: frosted for a matte look, but this otherwise looks like many of the other Color Sensational lipsticks from the outside.

Maybelline Creamy Matte Lipstick - Divine Wine Case

So dark! The flash makes this look not quite as dark as it is. It isn’t like… Nyx Soft Matte Lip Cream in Transylvania or Nars Train Bleu dark, but it is a pretty deep wine red.

Maybelline Creamy Matte Lipstick - Divine Wine - Open

Swatched. For reference on how dark it is, Maybelline Creamy Matte Lipstick this is sitting next to a well-known shade, Stila Stay All Day Liquid Lipstick in Beso. Should have let Beso dry, but I was rushing.

Maybelline Creamy Matte Lipstick - Divine Wine Swatch (Stila Beso above for comparison)

Though I will sometimes wear a bold red lip, I pretty much never wear a dark lip. In fact, I can remember the last time I did, not counting Halloween scenarios – my mom had a dark burgundy(ish)? Clinique lipstick ages and aaaages ago. I pilfered it. I was not even a teenager yet. That was all.
I am not vampy! I like sheer washes color on my lips and clean eyeliner. I am out of my comfort zone! Applying it, eeek, it is so dark. Just applied:

Maybelline Creamy Matte Lipstick - Divine Wine, Applied

And I love it! Again, slightly ligther in the flash, but trust that this is very fall appropriate.

Despite being called, “Creamy Matte Lipstick,” this is definitely more of a satin-matte finish; the lighter shades are slightly more matte. I think this finish is flattering with this color, personally, but if it want it so-matte-its-flat, this may not be the formula/color for you. It doesn’t feel dry going on – some matte lipsticks can skip or tug on your lips during application, leading to mistakes or uneven-application, nearly necessitating use of a lip brush. Not these! They glide on pretty easily and have great color payoff in one pass. They aren’t as unforgiving as a classic matte lipstick (I’m looking at you, MAC Retro Matte formula – I’ve seen what you’ve done to lips!) but I chose to exfoliate and treat prior just in case. So far, I haven’t noticed any feathering or sass from this lipcolor, but I would probably use a liner (if I had an appropriate color) with this one just in case.

I noticed, also, during application and wear, that the scent of the Creamy Matte Lipsticks remind me of the scent of the Nyx Soft Matte Lip Creams. I’m sure they share some common ingredients, though I’m not sure what they are. I would wager that it is whatever allows them to apply easily and remain matte. I love my Nyx Soft Matte Lip creams, but I already have a strong preference for this type of lipcolor to be in a lipstick form rather than a tube with a doe-foot applicator.

I got about about 3.5 hours of wear before needing to reapply, but that includes drinking two glasses of tea and eating dinner. I heard and confirmed that it wasn’t a punk about reapplying, but even the Nyx Soft Matte Lip Creams can be punks when it comes to reapplication. To be fair, I think expecting a lipstick to last through eating and drinking is entirely unrealistic – and this one does not claim to be long-wearing, so I am happy.

It is so damn new that even now, almost a week after I’ve purchased them, I cannot find them online anywhere. Not Amazon, not Target, not drugstore.com – but I will be sure to update you with a link as soon as I find one. In fact, I have another shade to share with you at some point – I’ll hold off until I can get a dang link for you.

Are you into matte hues? Seasonally-appropriate ones? Will you try one of the new Maybelline Creamy Matte Lipsticks, or stick with something more familiar like, say, a Nyx Soft Matte Lip Cream?

L’Oreal Voluminous Miss Manga Mascara

L’Oreal Voluminous Miss Manga Mascara isn’t exactly brand-new cutting edge at this point, but I never claimed to only bring you the newest of the new. You see, sometimes when an interesting product launches, people lose their minds and declare that it is glorious and perfect without giving themselves adequate time to try it out and see how it behaves. To borrow from a Lonely Island song, “Nah, that ain’t me.”

As much as I enjoy bareMinerals Flawless definition, I cannot swallow an $18 per tube mascara habit (and I just missed the Ulta 21 Days of Beauty 50% off sale day for it), so I will keep trying drugstore options until I find, “the one.” I picked up a tube of L’Oreal Voluminous Miss Manga mascara in Black-Brown when it was just launching, but only opened it last month to avoid having a ton of tubes open at a time to minimize waste).

Let’s check it out!

Here’s the tube – I personally prefer sleeker tube designs, but this one has a flat side that tapers on the cap for easy grip during application.

L'Oreal Voluminous Miss Manga MascaraL’Oreal Voluminous Miss Manga Mascara

Read more