Worth it? GlamGlow ThirstyMud

GlamGlow was conceived by a couple in Hollywood who were looking to help out some friends’ skin concerns. What started as a favor, friend-to-friend, ultimately developed into a wildly successful and popular skincare brand. Only available for retail for three years, they have received scads of awards for being awesome and are used personally, in salons/spas, and by the professionals the product was originally intended for.

GlamGlow ThirstyMud

GlamGlow ThirstyMud treatment

I’ve made no bones about the fact that I do not believe in miracle products. The purveyors of the YouthMud Tinglexfoliate and the SuperMud Clearing treatments released GlamGlow ThirstyMud around (I think) holiday season 2013.

Resources I generally trust thought highly of the brand, so when some of these people came forth raving about the GlamGlow ThirstyMud mask, I was intrigued. Though the mask can be applied and removed, the consensus was the same: slap it on before bed. Go to sleep. Wake up and be stunned by how awesome your skin looks (and feels!). Women reported that their husbands and boyfriends (who, per them, do not usually notice) were also noticing and commenting on the difference.

Kicker? The $69 price tag for 1.7 ounces of product. OUCH. I like masks, but that’s over $40 per ounce. Does it have gold in it? I promptly forgot about the product because it is simply too much to ask (for my needs and skin).

Read more

How to Dry Makeup Brushes

After you have thoroughly washed and rinsed your makeup brushes, it is important to see that they dry thoroughly to preserve the structural integrity of the brush and to prevent stuff like mildew.

Once you have rinsed your brushes, you should gently squeeze the bristles over the sink to remove excess water. At this point, you can lay them down horizontally on a towel in a well-ventilated area and leave them to dry, rotating them every few hours so that the side touching the towel can face up.

Alternatively, you can purchase a brush holder like this one or this one (larger) from Benjabelle. The base of the stand is in the center supports a platform that suspends the brushes upside down in silicone grips. Sigma also has a product for this purpose called a Dry’n Shape, which is a case that opens and folds into a cylinder with holders for brushes that dries and shapes them.

Or, you could be like me and forego the fancy equipment for now. Below, I have a few brushes in brush guards (which are also nice if you need to toss brushes into a bag that doesn’t have slots for them to keep them safe). They are suspended from a towel rack with a simple hair elastic (a regular rubber band is fine, too!) – something most of us have lying around the house.

How to Dry Makeup BrushesHow to Dry Makeup Brushes

To do this, take your elastic and hold it between the towel rack and the wall. Pull the top and bottom forward in front of the rack and slide your brushes in. This will secure your brushes there and we can (to quote Ronco) set it and forget it. I frequently tackle this whole thing at night, and by the time I wake up the next morning, my brushes are dry. If you don’t let them dry while you’re sleeping, though, remove the brush guard about 2-3 hours into drying – this will expedite the remaining time. Once all is done, enjoy your now-pristine brushes that may now feel like you’re rubbing a kitten on your face.

Disclosure: None of this stuff sponsored. That said, some of the links in this post are affiliate links – this means I may get a very small percentage of the sale if you decide to buy something. I’ll only tell you that something is awesome if I have verified it myself!

How to Wash Makeup Brushes

Anyone whose work or hobbies require heavy use of various tools can explain to you the importance of keeping your tools clean and well-maintained. That might be your father, husband, brother – or even you if you’re like me and are kicking ass and taking names in a male-dominated industry. Your brushes and sponges with which you apply makeup (or take it off if you like buttons and internet in your cleansing routine like I do) are your tools. In order to get the best performance and longest functional life from them, it is important to keep them clean. Maintenance does not have to be costly or time-consuming, though – I know I wasn’t thrilled with the prospect of cleaning my brushes with expensive brush shampoos and tools.

How frequently you wash your brushes is typically a preference and usage (as well as how many brushes you have) thing – obviously someone who wears a full face every day should wash more frequently than someone who wears a bit of makeup a few days a week. I don’t wear a full face very often, so I usually wash my brushes every 2-4 weeks with regular usage, more often if I think I need it. Eventually, you’ll be able to tell at a glance when something needs to be washed – the greyish-black brush used for last week’s smokey eye is not going to be so great for today’s light, neutral eye for work so you’ll want to clean it beforehand or reach for a different brush.

Turn your tap to warm (not hot – may damage your brush and not cold because good luck getting, say, foundation out with cold) water and – avoiding to get the ferrule wet – hold the brush under the stream with the bristles angled downwards to saturate the bristles and (hopefully!) rinse away some of the product.

How to Wash Makeup BrushesHow to Wash Makeup Brushes

Next, you’ll need to shampoo the brush – you can buy a cleanser specifically for makeup brushes if you want, but I personally use Johnson’s Baby Wash on my brushes (any baby wash or shampoo will do just fine). It is gentle enough to clean both natural and synthetic bristles without overdrying and/or damaging the fibers. If I’m worried my brushes are particularly grungy, I’ll use a drop or two of Dawn dish soap (the anti-bacterial varieties are good for this if you’re concerned about germs – I’m not) in conjunction with the baby wash for a deep clean. Other times, if I’m lazy and only have 1-2 brushes but am also cleaning my BeautyBlender, I’ll just use my BlenderCleanser Solid (left in the photo, white disc).

Some companies (like Sigma!) offer neat brush-cleaning gloves to help facilitate the process, and while these are fun-looking, they are not necessary. Your hands will do just fine – or, if you have a handful of brushes to wash and you don’t want your hands to get prune-y, you can get creative like I did (above photo) and use something like the surface of my Ziploc container lid. In this case, the indents for the logo will help work the soap into the bristles, almost acting like an agitator. If using your hand, dispense a small amount of the soap into the palm of your hand and swish the brush back and forth in your palm, then work the shampoo in further with your fingers. If you’re doing what I am demonstrating above, dispense the soaps onto the lid (or into your fancy Sigma glove), and swish and swirl it back and forth. The suds you create will eventually look dingy and frankly, gross, but that’s normal and fine and means your efforts are paying off.

Rinse your brush in the same way you initially saturated it, under the faucet with the bristles angled towards the drain, avoiding the ferrule as much as possible (exposing the ferrule to too much moisture can work away at the glue and cause the brush-head to come loose). Use your fingers to thoroughly rinse the bristles until they are their original color and free of suds.

Gently squeeze bristles to drain excess water from them, then reshape and dry. Check back on Wednesday for some tips on how to dry your makeup brushes!

Disclosure: None of this stuff was sponsored. That said, some of the links in this post are affiliate links – this means I may get a very small percentage of the sale if you decide to buy something. I’ll only tell you that something is awesome if I have verified it myself!

Milani EasyBrow Automatic Pencil

I overlooked it for years, but the presence of groomed brows can really do a lot for a face. There are various methods by which you can achieve this – brow pencil, brow powder, tinted gel/mousse/pomade, brow tinting (dye), or if you’re extra-extreme you could go for the whole, “permanent makeup,” bit aka tattooed on awkwardness. If you want to keep things easy, pencils or powders are the way to go. I wanted to try a pencil without shelling out for an Anastasia Brow Wiz, so enter Milani EasyBrow Automatic Pencil (which has a similar idea, packaging-wise, as the Brow Wiz).

 Milani EasyBrow Automatic Pencil - Natural Taupe and Dark BrownMilani EasyBrow Automatic Pencil – Natural Taupe and Dark Brown
The messy cap? That’s why you don’t cap things without looking at them.

Surprisingly hard to get me hands on in my area (no one seems to carry it! I had to order it), I was excited when the products arrived. The stick has two ends – one end houses the product, and the other contains a spoolie brush, both are protected with a cap. The center of the stick is printed with the product name and color but it is printed in gold (the stick, as you can see, is a light brown or taupe color) and is difficult to read. Fortunately, closer to the spoolie end there is a band with the color printed on it. I purchased Dark Brown and Natural Taupe; my brows either neither color, but I planned to use them in concert with one another and blend them to get closer to my haircolor.

The Milani EasyBrow Automatic Pencil was a bit surprising to me. It is both wider in diameter than I anticipated and it is SOFTER than I anticipated. Softness isn’t usually a quality we think of as negative, but when it comes to a brow pencil, you want a stiff product so you can easily produce dozens (or however many) of feather-light strokes that help define your brows. With this pencil it is entirely to easy to slip and end up with an awkward, hard line because it is so soft.

They have the consistency of a liner pencil (it glides too much!) rather than what a brow pencil should have. That isn’t to say this is a bad product, but there is a learning curve associated with it – you have to hold the product at an angle and use short, flicking strokes to achieve the right look. If you went a little too far, don’t worry – you then blend it out/together with the attached spoolie. Since the Milani EasyBrow Automatic Pencil is so soft, blending isn’t a very big deal…you will want to clean the spoolie off every so often, though, just as you would any other brush.

Milani EasyBrow Automatic Pencil swatchesMilani EasyBrow Automatic Pencil swatches – light hand above, more pressure below
From Left: Natural Taupe, Dark Brown

In all, although the products serve their purpose, I am on the fence about repurchasing. I really like brow powders and feel that I can get a more precise look with powder and wax than I can a soft pencil like this. This product, however, is very purse/makeup-bag-friendly and for those with much darker brows than myself may not be bothered by softness (rather, the ease of getting too bold a line). Someone who has more time to spend on their makeup regularly might be more satisfied than I am but ease and efficiency are both things that come into play, especially when I’m talking about a product called, “EasyBrow.” I don’t hate it, and I’m not immensely disappointed – but I was definitely hoping for greater performance from this product. If you’d like to give it a shot, the Milani EasyBrow Automatic Pencil is available from retail drugstores and drugstore.com for around $5.

First Look: Sigma F80 Flat Top Kabuki

An awesome friend (we’ll call her C) of mine recently decided to gift me a brush, and let me choose what brush it was – I chose a Sigma F80 Flat Top Kabuki! The Sigma F80 Flat Top Kabuki had been on my lust list for a while after hearing Jaclyn Hill rave about this brush in, oh, every video she has, so this was very exciting. Most of my brushes are what would be considered low-to-mid-end – I got the Coastal Scents Elite set on sale for something like $25, and the rest are random – cheap brushes that I thought would be “throwaways,” that turned out to be awesome, a few (inexpensive but great) bdellium tools and two Real Techniques. Word on the street is that Sigma is as good as (perhaps better than) MAC at a nicer price.

The outer shipping box had been manhandled by USPS and was not a maiden fair, so we’ll start the unboxing here:

Sigma F80 Flat Top Kabuki - Packaging

Also, let it be known that said friend is not affiliated with Sigma. She didn’t get a freebie for the sake of promotion, either. She’s just awesome! Here’s the rest of what was in the shipping box, including the brush that has been removed from the fancy sleeve depicted first:

Sigma F80 Flat Top Kabuki - everything that was in the shipping box

The protective sleeve you see on the brush, below is actually two parts. The lower handle is covered with a cellophane piece (with an awesome holographic Sigma sticker), and the upper handle and head are protected by a thicker, rigid plastic piece. They mean business about packing and protecting their product.

Sigma F80 Flat Top Kabuki - Unboxed

This sucker will be an important part of my foundation routine – especially come July, as I am not hiring a makeup artist for my wedding. So pristine!

Sigma F80 Flat Top Kabuki - Unboxed 2

Hello, gorgeous. I can’t wait to awkwardly stipple and buff foundation into my face with you. Let’s face it, stippling looks awkward. You’re hitting yourself in the face rapidly. It is silly.

Sigma F80 Flat Top KabukiSigma F80 Flat Top Kabuki Brush

Take a look at how dense this brush is, perfect for buffing foundation in and building coverage. Though I plan to use it with a liquid foundation (MUFE HD Invisible Cover in 118, Flesh), you could probably use this for mineral or powder foundation.

Sigma F80 Flat Top Kabuki - so dense!

I haven’t had the chance to use it yet (my skin has been wonky, but is almost 100% again) but I plan on using it tomorrow and am excited to see how awesome my very first Sigma brush is. Thank you again, C!

Disclosure: This post was not sponsored. That said, some of the links in this post are affiliate links – this means I may get a very small percentage of the sale if you decide to buy something. I only recommend products I’ve tried and verified as awesome.

More Info: Olay Pro-X Advanced Cleansing System

Olay Pro-X

Olay Pro-X Advanced Cleansing System - back

I have written about the Olay Pro-X before, and, as promised, wanted to deliver a more-robust review. You will notice that the images depict some slight discoloration at the “seams” of the device – we have hard-ish water, but I assure you it is clean, just well-used. I do not approve of sharing photos of filth. Here is the back of the device, complete with logo on the battery cover. The larger of the two grey buttons is the power button, the smaller is the speed control. The Pro-X has two speeds: normal and gentle. This device does not have a timer like some higher-end devices do, so you are advised by Olay to time yourself for about a minute.

Olay Pro-X Advanced Cleansing System - side

Here’s a profile shot of it to give you an idea of the thickness. The Olay Pro-X is a small, lightweight device – fairly travel friendly. The bristles are bent because I was not careful enough about letting it dry after its last use. They snap back with no complaints after your next use. Though other devices position the buttons on the bristle-side of the brush, it is no more difficult or inconvenient to use, given the device’s small form-factor.

Olay Pro-X Advanced Cleansing System - front

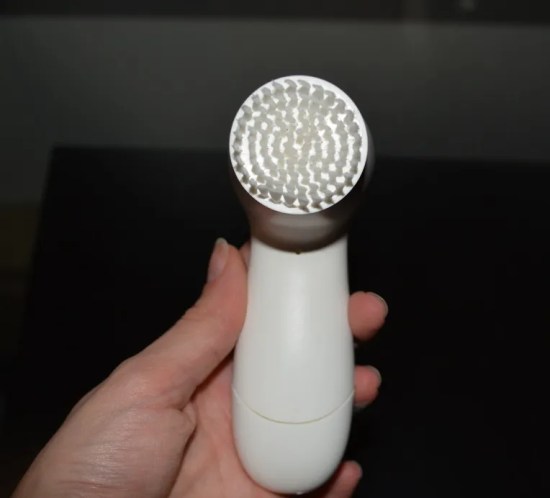
There’s nothing interesting on the “front” side of the device except the brush head itself. Olay currently only offers one brush so far (not counting the sponge thing for their Microdermabrasion stuff – but that is new-new, and I have not tried it), and the bristles are pretty long and soft. I have had no issues with them on either speed – but then again I do not have sensitive skin. If you have, or suspect you have sensitive skin, start on the lower speed juuust in case. While using it, if you apply too much pressure, the bristles are so soft that they have a good bit of “give” to them – so don’t mash it up against your face or you will just make your bristles wonky and you’ll be wasting your time.

Olay Pro-X - brush head removed

Pro-X brush heads are not overly expensive to replace at $7-8 for two. Olay did not include any guidelines on how frequently to replace them, but I wound up doing it every 3-4 months, at the same time I changed my toothbrush’s brush head. Popping the brush head off is easy – hold the device, grab the plastic “back” of the brush head and gentle pull free; it pops right off. Doing so reveals the pentagonal post it sits on that is rotated by the motor and really does all the work of this device.

Olay Pro-X - back of brush head

This is the back of the brush head. Nothing exciting here, really – let’s move along. In fact, let’s move along to the most infuriating, ridiculous part of this contraption: replacing the batteries.

“Hi!” it says. “I’m the Olay Pro-X! I’m a friendly little critter until I start behaving sluggishly and you have to replace my batteries. Then I am a horrible fiend!” It’s okay, friendly reader. I’ve been where you are. I had to look it up, too, because I was about to bash it off the counter because while it obviously has to open somehow, it is not obvious how.

Because I do not have extra arms, I couldn’t really show you ALL of this and take a picture. So I’ll walk you through it and hopefully this picture will help. With the “back” of the device facing you, firmly grasp the body of the device in one hand. With the other, place your forefinger and thumb on the bottom battery cover. I find it easiest to brace my thumb against one side and my finger against the other, kind of how I have shown here. Pull down and to the right (a rocking motion sometimes helps!), and this it will pop open. Be careful until you have the hang of it – you don’t want to apply too much force lest you break it.

Olay Pro-X - how to open

Once you have triumphed, it will look like this. The bottom piece comes off completely, and there ARE battery guides to show you which side should be positive-up, etc. The Olay Pro-X takes AA batteries and comes with a standard pair of alkalines. After they died, I switched to rechargeables. Swap your batteries, and the cover snaps right back in place without problems. This was my only substantial complaint about this device.

This device is waterproof and does have a rubber O-ring to protect areas from water exposure. I stored mine in the shower and had no issues aside from a little discoloration. With daily usage (one time per day), I got about 4-6 months out of a set of batteries – not bad, all things considered. I never felt that it was too harsh on my skin or that I was over-exfoliating (I hear people tend to overdo it with higher-end devices). I’ve used different cleansers with it without issue (though I wouldn’t use this to OCM). Its maintenance is not costly if you go with rechargeable batteries and watch for sales on brush heads. I would caution against using this device on the thin, delicate skin in your eye area; the Olay Pro-X cleans manually via spinning the brush head. The spinning motion could tug a little on the eye area which most now know is inadvisable.

In summation, it is a nice entry-level skincare brush with few bells-and-whistles. A welcome upgrade from a washcloth, it would make a thoughtful gift for someone into skincare, who wears makeup, or someone who perhaps struggles with acne. They are available for $20-30 in most drugstores, mass-retailers (Wal-Mart, Target), and online via retailers like Amazon, drugstore.com, soap.com, and others.

Disclosure: This wasn’t sponsored! That said, some of the links in this post are affiliate links – this means I may get a very small percentage of the sale if you decide to buy something. I will only ever tell you that something is awesome if I tested it myself and believe that.